


Optimizing images on your Webflow site reduces loading time and improves SEO without sacrificing visual quality. Best practices: size images to their actual display size (rarely more than 2000px), compress them before upload, and prioritize lightweight formats like WebP.
The importance of optimizing images on your website
Today, the performance of a website is crucial to offer a quality user experience and improve its ranking on search engines. Optimizing images plays a key role in this approach, because properly adjusted images can significantly reduce charging time of one page, improve your SEO score and engage visitors more. This new article explores best practices for optimizing your images, thus reducing the weight of your web pages while maintaining the visual quality needed to captivate your audience.
Best practices for speeding up my load times
1. Image resizing
Proper image sizing is the first critical step for optimization. Using images that are larger than necessary can result in unnecessarily long loading times.. It is essential to adjust the size of the images to the size that they will actually occupy on users' screens.
On the majority of my websites I never exceed 2000px maximum. This is more than enough for the majority of screens while maintaining good quality. In order to manage the size of your images, you can use tools like Resize Image.
Tips: Using the shortcut - Cmd + Shift + i - on Webflow to scan all the images on your project in order to create an optimized version for each breakpoint.
2. Compress your images
Image compression reduces their file size without significantly compromising quality visual. There are two types of compression: lossy and lossless. Lossy compression reduces file size by permanently removing some information from the image, while lossless compression reduces file size without sacrificing image quality.
Use image compression tools like TinyJPG can help you find the balance between quality and file size.
3. What format should you choose?
The choice of image format is decisive for optimization. Each format has its advantages and disadvantages depending on the use. Here is an overview.
3.1 JPG/JPEG
Ideal for photographs and images with lots of details and colors, the JPG (or JPEG) format offers a good balance between image quality and file size.
3.2 PNG
PNG is highlighted for transparent images or requiring lossless compression. Although the files are larger than JPG, they are great for logos and images with uniform color areas.
3.3 Webp
WebP is a modern file format created by Google that offers very powerful compression and with no (or very little) loss of quality for images on the web. He brings files smaller than JPG and PNG while maintaining equivalent image quality or higher.
It is the best format to use on your website in order to get the best balance between page weight, quality and loading time.
It represents 90% of the visuals I import on my web projects.

3.4 SVG
SVG is ideal for icons, logos, and illustrations. As it is a vector format, it can be resized without losing quality, making it perfect for graphic elements and also very light. However, it is not eligible for conversion to Webp format.
Put into practice on Webflow
Webflow makes it easy to optimize images thanks to its integrated tools and its ability to manage various formats. By uploading your images, Webflow offers the possibility to compress them in Webp in the library.
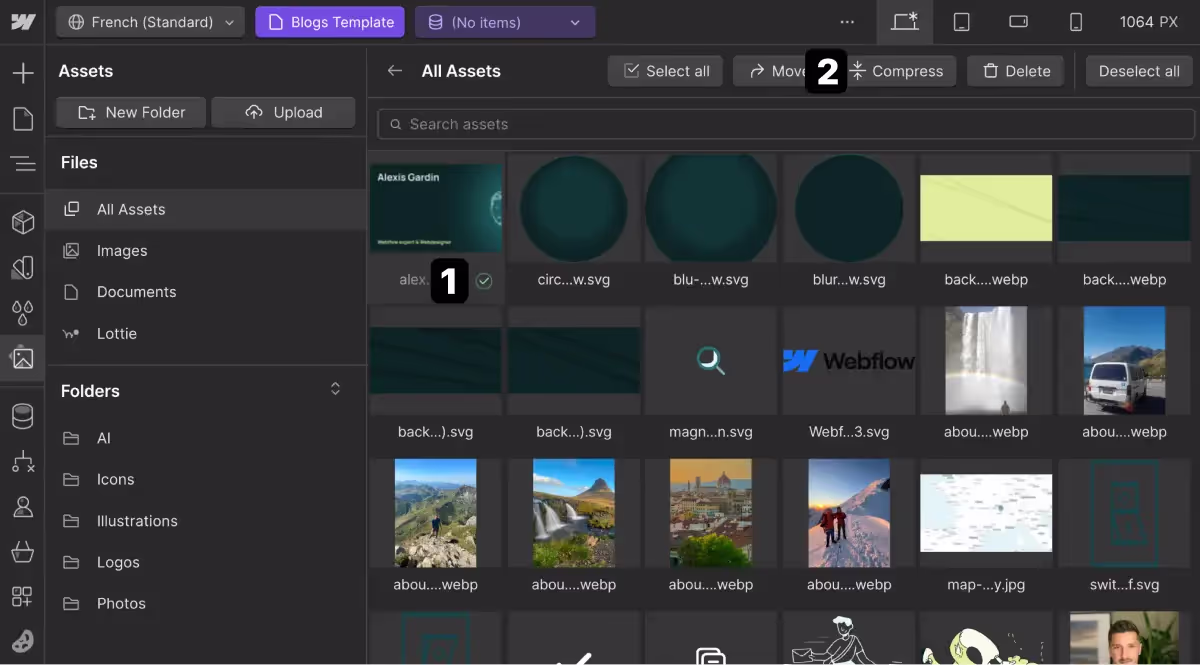
How to optimize your images from Webflow
- Go to the library
- Select one or more files you want to convert
- Click on “Compress”
Towards a faster site: a summary of image optimization
Optimizing the images on your Webflow site is an essential step for improve both the loading speed of your pages and the user experience. By following the best practices outlined in this article, such as sizing1 correct, compression2 effective, and the careful choice of format3 of image, you will contribute to the overall performance of your site.


